Disabling USB Drives Without GPO

We needed to disable read/write access to USB drives on several machines that aren’t joined to a domain.

The obvious way to do this is with group policy, using the following:

Computer Configuration > Administrative Templates > System > Removable Storage Access

In that section, the following policies define removable storage access:

  1. Removable Disks: Deny Execute Access
  2. Removable Disks: Deny Read Access
  3. Removable Disks: Deny Write Access

Those policies are self-explanatory and in a domain environment, that’s the only thing to set.  In a non-domain environment, set the registry keys associated with each policy.

These are set under the following registry key:

HKEY_LOCAL_MACHINE\SOFTWARE\Policies\Microsoft\Windows\RemovableStorageDevices\{53f5630d-b6bf-11d0-94f2-00a0c91efb8b}

The GUID is the same on all versions of Windows and represents the Removable Disk type.

Then, set a DWORD to 1 for each type.   The listing below contains the values to disable all access to USB drives:

Windows Registry Editor Version 5.00

[HKEY_LOCAL_MACHINE\SOFTWARE\Policies\Microsoft\Windows\RemovableStorageDevices\{53f5630d-b6bf-11d0-94f2-00a0c91efb8b}]
"Deny_Write"=dword:00000001
"Deny_Read"=dword:00000001
"Deny_Execute"=dword:00000001


Find Auto-Ignored Automate Patches

Something went haywire in our approval policies in Automate. I noticed that there weren’t any definition updates to approve this morning.

Looking into it further, I found that several hundred patches had been set to ‘Ignore’ by the approval policies. After disabling the offending ignore rule, I needed to undo the damage and manually approve those patches.

To find them, I ran this query:

SELECT Title, SetTime, SetBy, approval FROM patchapprovalsettings
JOIN hotfixdata ON patchapprovalsettings.hotfixid = hotfixdata.hotfixid
WHERE SetBy = 'Auto' AND approval = 1
ORDER BY SetTime DESC

Then I went into patch manager and fixed the ones that had been incorrectly set to ‘Ignore’.

Duplicate Data In Datto Automate Plugin

Something changed over the weekend in the Datto Automate plugin, which broke the integration and our internal backup checks.

Specifically, it looks like the “Volume” element is now reporting as a name, like the “Agent” attribute always has.

However, this caused the Automate plugin to create new IDs for almost every server because it uses the “Volume” element as a key.

Take a look at this example:

id device_serial_number ClientID LocationID type volume operating_system agent
123456 111111111111 1 1 Agent exampleserver Windows Server 2008R2 exampleserver
123457 111111111111 1 1 Agent 192.0.2.1 Windows Server 2008R2 exampleserver

Notice that the volume column is different and that difference created a new row with a different id value.

In our system, we need to delete all of these old rows to fix the monitors.  To find them, here’s a quick and dirty SQL statement:

SELECT volumes.id FROM plugin_datto_backup_volumes volumes
LEFT JOIN plugin_datto_backup_volumes AS volumes2 ON ((volumes.agent = volumes2.agent) AND (volumes.device_serial_number = volumes2.device_serial_number))
WHERE volumes.id < volumes2.id
AND (volumes.type = 'Agent')

I don't claim to be any kind of SQL expert, so deleting these is at your own risk.  The above finds everything in the backup_volumes table that's a duplicate, based on the hostname and device serial number, then grabs the lower id, which is the older entry.

If you try to just throw that into a DELETE statement, you’ll find that there is an issue with self-referencing tables like that.  See a discussion about this issue on Stack Overflow here.

To fix that, you need to remove the references and make them full-table subqueries like this:

DELETE FROM plugin_datto_backup_volumes WHERE id IN
(
SELECT volumes.id FROM (SELECT * FROM plugin_datto_backup_volumes) AS volumes
LEFT JOIN (SELECT * FROM plugin_datto_backup_volumes) AS volumes2 ON ((volumes.agent = volumes2.agent) AND (volumes.device_serial_number = volumes2.device_serial_number))
WHERE volumes.id < volumes2.id
AND (volumes.type = 'Agent')
) LIMIT 30

Not the cleanest query ever, but it worked for me and closed out the mountain of tickets this generated for us.

I did this in batches broken up by LIMIT clauses because I hate deleting things.

There is, of course, absolutely NO WARRANTY or ANY SUPPORT PROVIDED for the above.   If it breaks your database, restore from backup.  It worked here.

CW Automate – Excluding Servers From Malwarebytes

While we use the Malwarebytes plugin bundled with Automate, one of the annoyances we have with the solution is that there isn’t an option to exclude servers from deployment.

For anyone unfamiliar with the setup, the plugin presents an auto-deployment option. This will deploy Malwarebytes to all machines at the client, unless the machine is specifically marked as excluded.

The issue with that approach is newly installed servers won’t have the exclusion checked and Malwarebytes will install.

There are a few ways to approach this:

The first approach we looked into was setting the configuration option via the script that runs when a new agent is installed. However, the exclusion checkbox isn’t a traditional EDF in that it’s stored in a plugin_ table and not in the extrafielddata table, so this would just be a SQL execution in that script.

I didn’t really like that idea, so wrote the following to update all servers at once:

INSERT INTO plugin_malwarebytes_computer_settings(computerid,policyGUID,excludeMBAM,excludeMBAE,excludeMBARW)
SELECT computers.computerid, NULL, 1, 1, 1
FROM computers
LEFT JOIN inv_operatingsystem ON computers.computerid = inv_operatingsystem.computerid
WHERE inv_operatingsystem.server = 1 AND computers.os LIKE '%Windows%'
ON DUPLICATE KEY UPDATE excludeMBAM = 1, excludeMBAE = 1, excludeMBARW = 1


This pulls every computer from the computers table that is a server.  For all of those, it inserts or updates a row in the table used by the Malwarebytes plugin to store computer settings and sets it to exclude.

Run that query manually once to exclude for all current servers.  To exclude future servers, run this as a scheduled client script every 5 minutes.

PowerShell, LabTech, and PSModulePath

This came up while working with a PowerShell script that needed to run from a LabTech script. The script tested correctly on my machine and from the LabTech server.

When running from the LabTech script, I used the script function LabTech server shell execute

The code looked something like this:

Command: powershell.exe
Arguments: C:\path\to\script.ps1 -parameter @variable@

I had the script log the output of this and received nothing but errors relating to module imports.

The first troubleshooting step verified that @variable@ was set correctly. That doesn’t really have any bearing on module loading, but it was something that I wanted to double check.

Next, I debugged that the command was formatted correctly by logging it and copying it verbatim into a cmd window on the LabTech server. That worked correctly.

Based on that, it became obvious that there was some type of environment variable problem in that the PowerShell script can’t find the required module files. The issue is that the way LabTech calls commands in that script function doesn’t load the system’s default environment variables, including PSModulePath.

Regardless of why it’s occurring (I suspect that it has something to do with the way the Database Agent processes the LabTech server shell execute command, the environment variables aren’t there.

There are a few ways to handle this, with varying degrees of kludge:

  • Place the required modules in the same directory as the PowerShell script
  • Determine where the required modules are and hard code their paths in the script so that Import-Module works
  • Dynamically load the system’s PSModulePath at runtime

The final item in the list of options is really the only one that makes any sense as the the others quickly become a maintenance nightmare. I can say with certainty that I wouldn’t remember to update the paths should they change.

Dynamically loading the system’s environment variable requires two steps:

  1. Find and read the system-wide environment variables at runtime
  2. Set the runtime PSModulePath to that value
    • On Windows, system environment variables are stored in the registry here:

      HKEY_LOCAL_MACHINE\SYSTEM\CurrentControlSet\Control\Session Manager\Environment

      In that key is a value called PSModulePath that represents the path used by the system.

      One way to read the registry in PowerShell is to use Get-ItemProperty with the path to the registry, then use the key name as the property:

      $systemPSModulePath = (Get-ItemProperty -Path 'HKLM:\SYSTEM\CurrentControlSet\Control\Session Manager\Environment' ).PSModulePath
      

      With that, the next step is to set the environment variable. PowerShell exposes environment variables with the $env variable.

      Putting the two sections together, the function to change PSModulePath into the system’s value looks like this:

      function Set-PSModulePathFromRegistry
      {
          # Get the configured path from the registry
          $systemPSModulePath = (Get-ItemProperty -Path 'HKLM:\SYSTEM\CurrentControlSet\Control\Session Manager\Environment' ).PSModulePath
          
          if( ! [string]::IsNullOrEmpty( $systemPSModulePath ) )
          {
              # Note, this _replaces_ rather than appends
              $env:PSModulePath = $systemPSModulePath
          }
      }
      

      After inserting and calling that function, the script ran correctly, without error.

Datto UUIDs to Agent Names

With the Datto Windows Agent, some of the normal shell commands used when working with agents behave differently.

For example, I’m accustomed to using zfs list when connecting to a device via SSH. I can confirm that the device is paired by IP instead of by name and confirm that the correct IP was used. The output would be something like this (extra columns removed)

homePool/home/agents/192.168.1.1
homePool/home/agents/192.168.1.2
homePool/home/agents/192.168.1.3

However, for servers that have the Datto Windows Agent installed, the ZFS pools are named after UUIDs:

               
homePool/home/agents/53f7d9b98fa84da8914b2d890c3cd551
homePool/home/agents/57c0741c8c454d0da29cd1d76f80b173
homePool/home/agents/1c7f0ca7c6464d3c87efd51406122516

I have no idea which agent is which from this and for the snapctl commands, I need to know the ID (technically, you can use the hostname here, too)

To find out which is which, use the following snapctl command: snapctl list

User@datto:~# snapctl list
53f7d9b98fa84da8914b2d890c3cd551 SRV1
57c0741c8c454d0da29cd1d76f80b173 SRV2
1c7f0ca7c6464d3c87efd51406122516 SRV3

Is it a Diff Merge or a Full?

Aside

This is a question that all Datto partners have had to ask at least once: “Hi, this is for serial XYZ. Is the backup running for agent 192.0.2.1 a full or a differential merge.

In case anyone isn’t a Datto users, a “differential merge” is a method used to fix problems with a backup. It reads the entire source disk for changes, but still only writes changes. This is opposed to a new full, which also reads the entire disk and can fix any issues, but has the obvious consequence of requiring enough disk space for a full backup.

It’s tough to differentiate between the two. Differential merges will usually run faster, but that only helps if you have an idea of what a normal transfer speed looks like for that agent during a backup.

One way I’ve been using to determine is to check the amount of data that is changing on the volume. As you know, Datto uses ZFS snapshots as backup points and changes are written to the live data (this is the “inverse chain” that you’ll hear referenced). To check how much data has changed on the live set, you can use:

zfs list -o name,creation,written homePool/home/agents/192.0.2.1

You’ll get something like this:

NAME                            CREATION               WRITTEN
homePool/home/agents/192.0.2.1  Tue Jul 15 22:32 2016    3.41G

This is similar to the commands used to view the real backup size. The ‘written’ column isn’t normally part of the output used for that because we’re normally running these after the fact to determine whether an agent took a full. ‘WRITTEN’ refers to the amount of data changed on the live filesystem.

To check for a full, preface this with a ‘watch’ command:

watch zfs list -o name,creation,written homePool/home/agents/192.0.2.1

If this number is staying relatively static (or at least increasing at a rate that matches a normal backup for this agent), you have a full. To double check, view this while you’re watching the progress of a backup in the web UI. If the agent is going through the volume and the number in the written column stays the same or is much lower than what the UI shows as complete, you have a diff merge.

As always, if unsure about any of the above, open a ticket with support.

Datto Won’t Checkin

I have a device that is not checking in. After contacting the client, the device is confirmed online.

In a remote session to a server on the client’s network, the device is answering pings and I can SSH into it. That’s when the trouble starts:


root@datto:~# checkin
Updating checkin script (using device.dattobackup.com)...
/datto/scripts/DoBackup.sh: line 93: /datto/scripts/pre-commands.sh: Read-only file system
Failed to communicate with checkin server, this is usually a result of network connectivity problems, exiting...
root@datto:~#

That’s the same “read-only” filesystem error message that I previously discussed in the context of a failed OS upgrade.

In that scenario, the issue is that fstab doesn’t have the right information for the software RAID array and is only able to mount read only.

The contents of fstab are below:


root@datto:~# cat /etc/fstab
/etc/fstab: static file system information.
#
# Use 'blkid -o value -s UUID' to print the universally unique identifier
# for a device; this may be used with UUID= as a more robust way to name
# devices that works even if disks are added and removed. See fstab(5).
#
#
proc /proc proc nodev,noexec,nosuid 0 0
# / was on /dev/sda1 during installation
UUID=c01732e2-8b21-4c3c-980f-97acab2326f3e
/ ext4 errors=remount-ro 0 1
# swap was on /dev/sda5 during installation
UUID=22ab332d-22e3-462b-98ba-d80a6c0956ea none swap sw 0 0
# array
root@datto:~#

What the heck? The first line should be commented out, but it isn’t. Additionally, the mount options for ‘/’ got broken into two lines. This seems like something that would be caused by a parsing script encountering input that it didn’t expect. Regardless, this certainly explains why the filesystem won’t mount.

So how do you fix this if it happens to you?

First, verify that the software RAID array is mounted. There are a few ways to do that, but I want to verify both that the array exists as a block device and that both members are a part of it:


root@datto:~# blkid /dev/md1
/dev/md1: UUID="c01732e2-8b21-4c3c-980f-97acab2326f3e" TYPE="ext4"
root@datto:~#


root@datto:~# cat /proc/mdstat
Personalities : [raid1] [linear] [multipath] [raid0] [raid6] [raid5] [raid4] [raid10]
md1 : active raid1 sdb1[1] sda1[0]
878916032 blocks [2/2] [UU]

unused devices:
root@datto:~#

Both drives are present, so we’re not looking at a data loss issue. The next thing to do is bring the device online read/write. Use the exact same method that we used while fixing the upgrade error:


root@datto:~# mount -o remount,rw /dev/md1 /
root@datto:~#

Now you can fix fstab. Similar to the previous article, this is probably a good time to call support.

That being said, if you want to fix it yourself, the solution here is to comment the first line and join lines 10 and 11 so that the mount options are on one line as intended.

Then your mount will work:


root@datto:~# mount -a
root@datto:~#

You’re pretty much set here. In my case, the lock on checkin was held so the appliance wouldn’t check in. However, I wanted to reboot anyway to make verify everything came back up.

Even if you did successfully get this up and running, I’ still suggest getting support to take a look.

Resetting Failed Patch Counts in Automate

At Automation Nation last week, I was reminded that failed patches only re-attempt twice before attempting installation again.

This is a problem as these failures often resolve without intervention.

I wanted to reset them periodically so that the patch manager can attempt the install again. However, it’s important to not do this constantly as you’ll miss legitimate failures.

First, the easy part: This information is stored in the hotfix table. That table has a row for every hotfix on every computer and a column for the failure state called failed. To clear the state, set that column back to 0.

That change is reflected immediately in Patch Manager and there isn’t any need to wait for an interval (aside from refreshing the lower pane on a device).

To reset all of the failed states at once, you can use the following query:

UPDATE hotfix
SET `Failed` = 0
WHERE `Failed`  <> 0

If you’d like to run this at scheduled intervals, run this in a scheduled client script. I’d suggest once per week or so.

Fixing LabTech Patching – Find Online Machines With ‘Unknown’ Patch Inventory

This is the first in a series of posts about fixing LabTech patching. This came up with the Wannacry ransomware that caused all partners to take a closer look at their patching setup.

Many of our machines are showing no patch inventory present, but are installing patches anyway. Even more interesting, these computers have run patch jobs. The scores aren’t updating and the last patch Inventory is Unknown:

Working with support, we found that clicking Resend to force an update to the inventory will solve the problem for that machine. However, I wanted to find a way to automate this.

NOTE: A previous version of this post incorrectly referenced the computerpatchcompliancestats table. While that information is available there, it requires finding all rows that are in one table and not another. Additionally, computerpatchcompliancestatsgets regenerated by the database agent once per day and won’t be up to date after a successful scan.

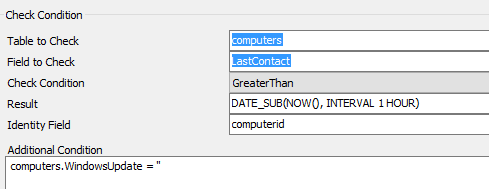
Information about when the last inventory was scanned is stored in the WindowsUpdate column of the computers table.

To find machines with this problem, look for rows without any value for the WindowsUpdate column. Note that this isn’t NULL but an empty string:

2017-05-22 15_19_33-CAPSTONE - Online Machines Without Patch Scan (209842)

You might also find machines that instead of having an empty have the epoch listed. Checking the database tables for this issue, some will be: 1600-12-31 19:00:00 (I had to look this up as I hadn’t seen that as the epoch before). Ones that have this value are likely broken and will require more than this script to fix (see the next post).

Next, create an alert template against this monitor that runs a script to execute the resend patch information command.

This is a one-line script that updates the inventory:

sendPatchInventory

This has made short work of the ‘No Inventory’ problem. You can use a similar issue to address machines that haven’t had a patch scan in a certain interval of time because of the configured schedules.